Tuesday, March 20, 2012

Where did the time go?


Holy cow!  Can't believe it's been so long since I posted.  I keep saying I'm going to get to it, but I never seem to actually do it!

Well, I opened another store on Etsy.  It's called Chairein, jewelry to bring you joy.  Chairein is the Greek word for joy.  So, here are my latest pieces....


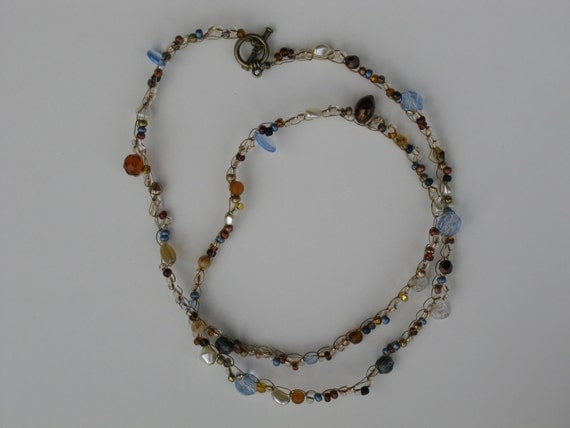
This necklace is crocheted with an antiqued gold colored wire .Glass beads include blues, browns, and golds. Long enough to wear doubled. Toggle clasp.  About 32"


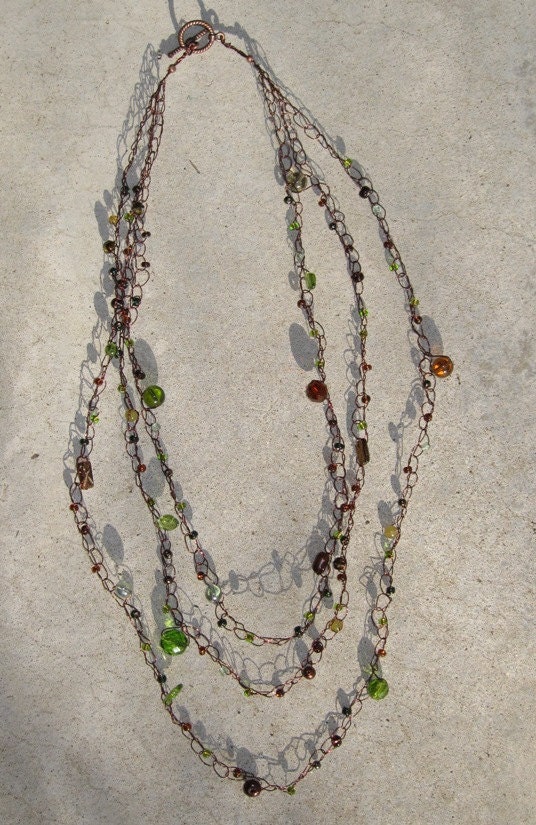
This necklace is crocheted with a lovely chocolate brown wire. Glass beads in green and brown coordinate beautifully. The shortest chain is 25 inches. The longest is 32 inches. Toggle clasp.

This one is really pretty IRL.


Crocheted Necklace--aqua
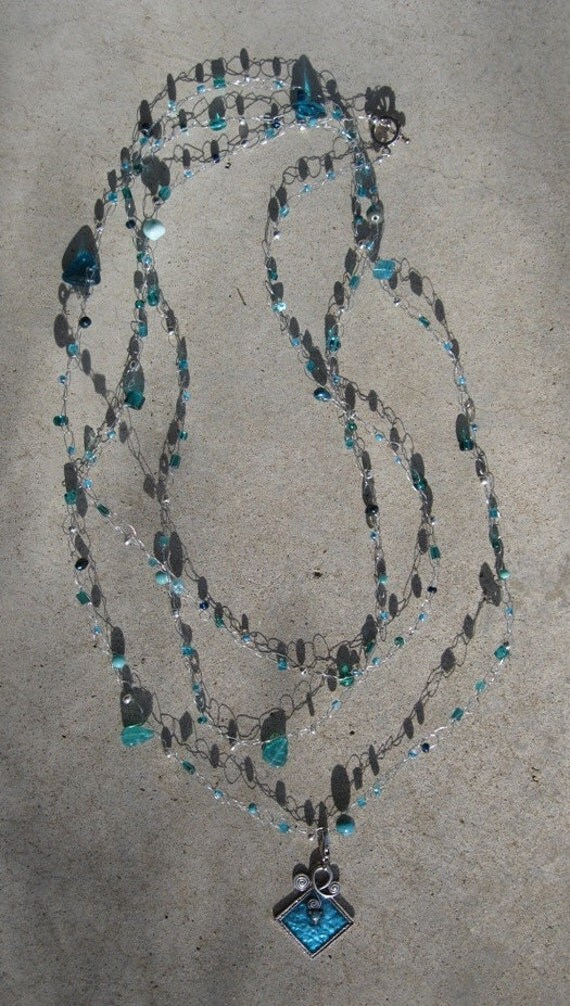
I have to confess, I have this in my shop, but I'm wearing it right now.  I love it! This gorgeous necklace is crocheted with silver colored wire and glass beads in shades of aqua and silver. At about 6 feet long, it can be worn numerous ways. The pendant is removable to wear or not and it's even long enough to be worn as a belt ! Toggle clasp.


Crocheted Necklace--aqua


Crocheted Necklace--purples
The photo doesn't do this one justice.  It is really pretty.  This beautiful necklace is made from crocheted wire and glass beads in shades of purple and pink. Toggle clasp. 19"


I made my first (and so far only!) pair of earrings to go with it:
Crocheted Earrings--purple


Crocheted Bracelet--reds
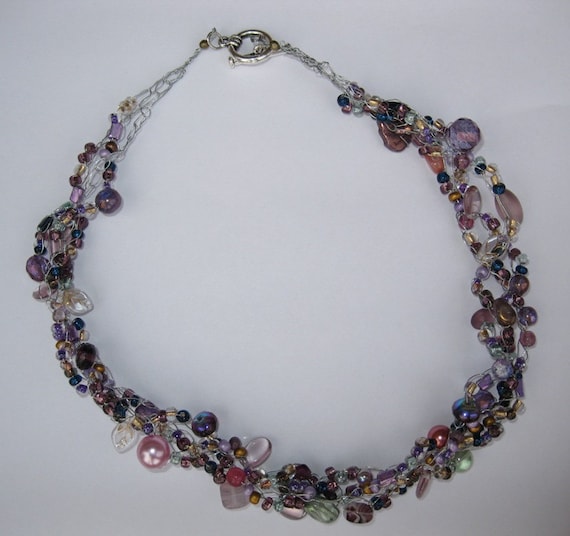
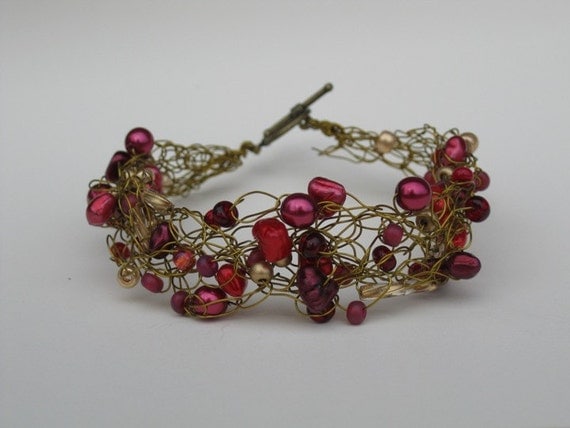
This is another of my favorite pieces!  This beautiful bracelet is crocheted in antique-gold colored wire with glass beads in gold and varying shades of red. About 8 1/2".. Toggle clasp.   It's actually made from six separate strands braided together.


That's it for now.  I'm nodding off at my desk when I'm supposed to be working.  Gotta quit playing and start getting more sleep!


Saturday, February 25, 2012

Crocheted wire and bead necklace

I went as a chaperon on a ski trip last weekend.  Unfortunately, after only about 2 hours out on the slopes (first time in 27 years.  I learned to ski in utero!), my shoulder and the ground had made contact a few too many times.  Nothing broken, but a severe strain and maybe rotator cuff involvement (I find out next week).  Anyway, the trip was up in the quaint little town of Galena, IL.

On Sunday afternoon, we all went into town for a few hours before heading home.  Of course I had to go into the local bead store--Galena Beads.  Fortunately for my husband, I was already feeling too guilty concerned about how much the trip had cost since my son and I were both participating.  Otherwise, I would have spent a fortune in there!  One thing I really wanted but didn't get was a kit for making crocheted wire beaded necklaces.  I know.  I'd never heard of such a thing either.  They were gorgeous.  Even my son's girlfriend, who makes jewelry (so I've heard, but never seen) and is an artist as well, thought they were really neat.  Well, being the cheap frugal person that I am, I figured I could find directions online if I looked.

When we got home, after saying hello to my husband and daughters, I got online (Note: it's hard to type with one arm in a sling!).  I found a number of directions and video tutorials. I couldn't wait to get started.  However, after 3 hours of walking around Galena, a 5 hour trip home, and an arm in a sling (and did I mention I also twisted my knee something fierce trying to get up after I slammed into the ground?  Then smacked into a trailer hitch on a parked car?  Can you say klutz?), I decided I better get to bed if I was going to be at work on time at 8:00 AM.

Ahh!  Monday evening finally arrived.  I went downstairs to my crafting lair.  I had a whole assortment of miscellaneous beads that came in my Club Scrap kits that I used to order, and I had some wire from a 6 pack set that I'd bought but never used.  And happily, I even found the crochet hook that my mother loaned me about 10 years ago that I never returned!  I was ready.

Now, being me, I made a few mistakes along the way.  I won't bore you with the details.  But in the end--about 90 minutes, including about half that time to select beads--I had a finished project.  OK.  Almost finished.  I didn't have the kind of fastener I wanted, but I really wanted to wear the necklace.  So I used what was on-hand with the intention of replacing it with a nice toggle.

Today I got the toggle and replaced the lobster claw clasp I had had.  I love it!  I posted it on facebook the other night, modeling it (that wrinkly thing surely couldn't be MY neck, could it?).  My niece commented that it was the kind of thing she'd wear.  So I guess I'm going to be  mailing it to her.  I got to wear it once, an I did love it.  But I have many necklaces in the same shades, and I figure I can always make another one!

I'm so excited about these that I went to Hobby Lobby and spent what I convinced myself not to spend in Galena!  But I'll probably be able to get about 4 or 5 necklaces for what I would have paid for two kits, so I consider that being ahead.  And with luck my husband will some $$ at his poker game tonight, too!

Hope you like the necklace.  I'll post more when I finish them.


Be sure to stop by I Gotta Create and check out all the awesome projects by other bloggers at the linky party!


Friday, February 17, 2012

Star of David

My sister complains that it is hard to find Judaica jewelry.  I decided to make her a Star of David with metal clay.  The picture doesn't do it justice.

I had made a stamp of this design for Rosh Hashanah.  I used the stamp to make a mold with Mega Mold.  It took me four tries to get it right!  I suggest letting it dry for another 15-20 minutes without the object being used for impression to make sure it's solid.

Then I used the mold with the clay.  After removing the clay, I used my tissue blade to cut away the excess.  I wanted to add a crystal in the middle, but they don't hold up under firing. I knew I'd have to glue it in later.  But the center impression was perfectly sized, and I knew it would shrink with firing.  So how to hold it open?   I had a jump ring that was the perfect size of the opening, so I stuck it in and fired it in place.  Of course, that meant it wouldn't come out, and the firing changed the color to black.  So to fix that, I painted oil paste over the top of the jump ring and re-fired it.  Now it was silver like the rest of the piece. Then I glued in the crystal.

The one thing I forgot to do was to use my acrylic block to press the design before drying to smooth it out somewhat.  So it ended up being a little rougher than I would have liked.  However, overall, I'm pleased.  and my sister loves it, so that's what matters!


Thursday, February 2, 2012

More Jewelry

I finally finished a ring with my metal clay!  It was certainly a process.  The first one I made I didn't fire enough (I guess), and I used Swaroski crystals.  Firing them was kind of like holding chocolate chips in your hand.  And since I didn't fire it enough, part of it snapped when I was polishing it.  I tried to put it back together, but it was that extra firing that melted the crystals.

So I got some lab created spinels (thanks to my DH for the birthday present!) and set to work again.  The first attempt ended in disaster.  Once again, the ring snapped.  (I get the concept of being "tested in fire" now!).  However, I was able to salvage the set gems and part of the ring itself to create earrings.  I really hate wasting things!

Back to the drawing board.  Or rolling pin.  The next attempt looked good.  Got it dry to the leather stage.  Then I decided it wasn't quite right, so squashed it up.  Actually, I let it dry out so I could rehydrate it to try again.

If at first, and second, and third you don't succeed, give it one more go!  Finally!  It worked.  I do have one confession, though.  One of the gems didn't set far enough into the clay, so it has popped out a few times.  The first time it popped out, I was cleaning it to wear.  I used oil paste to replace it.  The next time I was at a restaurant.  It popped out on the table, luckily. I used glass/jewelry glue. Last night it popped out again and I lost it.  The gem I mean.  Not my mind!  Anyway, I had one left, so I used it instead. Super glue.  I sure hope it's super and stays glued!  It may be time to see what "real" jewelers use.
The texture is made from sandpaper.


Tuesday, January 24, 2012

More Paisley, etc

Last week I posted a pic of a paisley card I made after scanning some fabric.  Well of course, there was more paper left, so I had to make another.  It was supposed to be a birthday card for someone, but I forgot to send it.  Thank heavens for email instead!

Aside from the background paper, all I did was emboss the frame tag with black embossing powder, then stamp the sentiment.  Super easy!


This is an attempt at coloring with alcohol based markers.  Even as a child I stunk at coloring, so this is hard for me. It didn't come out too badly though. After stamping and coloring (using Bics, not anything expensive) I used an air tool to splatter the background a little (using water-based markers), then sponged some ink around the edges.  All finished!


I made this card for a challenge over at Splitcoast Stampers.  It was supposed to be based on an Irish pottery, basically using an embossing folder with the negative side inked up.  It reminded me of wedgewood china, so I did mine in blue.  The stamp is from SU! from the I  (heart) hearts set.  I kept this part simple so it wouldn't detract from the background.  Sometimes I think there are so many embellishments that the cards drown in them.  So doing something simple for a change is nice.  All I did then was add a matching ribbon.  I used two rows because one looked too wimpy.  I didn't want anything wider because it didn't look delicate enough.  Two small ones was the compromise.  But I will say it is hard to smooth out ribbon over an embossed background!


Sunday, January 22, 2012

Whole Hearted

The other day as I was perusing Pinterest, I came across a free digital paper download from Papercraft Inspirations.  Along with the download, they asked to see what you created from them.  So, here are my creations.


The first card is made with a strip of one of the half sheets of paper, and the heart postage strip.  The three hearts are made with a Stampin Up! embosslit.  The pink heart was stamped with the filigree background stamp.  The print heart is from the downloaded paper.  The bottom heart is SU! pool party.  The sentiment and stamped hearts are also SU!


The coloring on this card is a little hard to see.  The papers are all SU!  I'm not sure what the 2 pinks are.  The brown is chocolate chip and the blue is pool party.  The pink circle is stamped with the filigree background stamp.  The sentiment in the middle is from the Papercraft Inspirations paper.  The hearts are punched with the SU! heart punch.


This is my favorite.  The background paper is the download.  The butterfly is from a die cut/embossing set that I don't remember what it is!  The hearts are from the SU! heart punch.  The metallic hearts are from Imaginisce.


So, go download your own paper and get started on your valentines!


Monday, January 16, 2012

Two New Cards

I haven't made any cards for a bit, so this weekend I made 2.  Oddly enough, I bought some spellbinders die cuts this weekend, but didn't use them for either card!  Oh well!

The first one is made with background paper I made by scanning a piece of fabric.  I bought this fabric to make a cover for my Kindle.  I liked it so much, I thought it would make good designer paper.   I also decided it would make a great scarf to wear with a black shirt, or to add to a t-shirt for a designer top.  Might have to do both of those!  In the meantime, here's the Kindle cover and the card.


 I love how the hearts just happened to come out like they did.  I'll use this card for a Valentine's.


I saw a similar card this summer when I was at the scrapbooking convention in Arlington, TX.  It used the same stamp set, with eyes and smiles.  This is my take on it.